
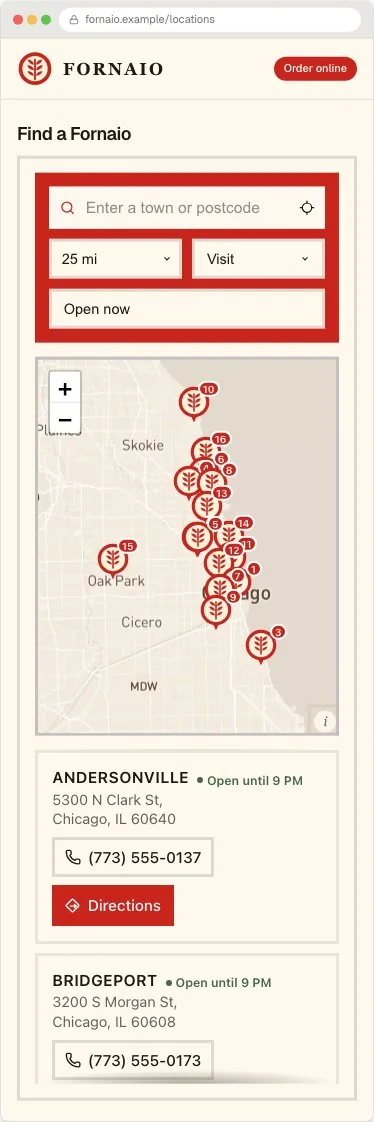
How an embedded locator actually works
Understanding the mechanics turns the install from a ritual into something you can debug. A hosted locator embed is two lines: a script tag that loads the widget code, and a placeholder element carrying your site id. When the page loads, the script finds the placeholder, fetches your locations and settings, and renders the search box, results and map inside it.
A well-built widget renders into a shadow root, which is the browser's mechanism for isolating a component's styles. It means your theme's CSS cannot accidentally restyle the locator and the locator's CSS cannot leak into your page, which is why the same embed works identically on a WordPress blog and a hand-coded site. It also means the locator carries its own fonts and colours as settings rather than inheriting them, so brand matching happens in the locator's dashboard, not in your stylesheet.
Because the widget is fetched at load time, changes you make in the dashboard appear on the site without touching the embed again. You paste once, then never edit the page for a data or styling change.
Step one: the spreadsheet is the product
Every locator is a view over a list of places, so the list decides the ceiling of the page. One row per location. The columns that matter: a stable name, street address, city, region, postcode, country, phone number and opening hours, plus one column for each thing visitors should filter by, such as services offered or product lines carried.
Two rules save the most pain later. Keep names canonical, because reimports match rows by name and a renamed location becomes a duplicate pin instead of an update. And write addresses the way the postal service would, because they are about to be geocoded, and a tidy address geocodes to the right rooftop while a creative one lands in the wrong suburb.
The CSV import guide covers column mapping and the messy-data cases; teams that edit locations weekly should read the Google Sheets sync guide instead of living in export files.
Step two: import, then read the report
Upload the file and the locator geocodes every row, turning addresses into map coordinates. The import report is not a formality. It lists rows that failed to geocode, rows that look like duplicates and rows missing fields visitors will expect. Fix these now, while you still remember what the data means: the same problems found on the live page cost more, because by then a visitor found them first.
Spot-check the map after import. Pick the three locations you know best and confirm their pins are on the right buildings. Systematic geocoding errors, like every pin sitting one town over, are visible in ten seconds here and invisible in a spreadsheet.
Step three: make it look like your site
The difference between a locator that reads as part of the site and one that reads as bolted on is a handful of settings: typeface, brand colours, button and marker styling, corner radius and map style. Set them before you embed, because judging them inside your real page is easier than judging them in a preview.
Configure the visitor journey while you are here. Which fields search matches, the default radius and distance unit, which filters appear, and what each result card shows. Cards should carry the address, hours, phone and a directions link at minimum; hours matter more than anything else on the card, because a visitor who cannot see them leaves for Google and may not come back.
Step four: paste the embed where your platform allows raw HTML
Every website editor has one place where pasted HTML is kept as markup instead of being escaped into visible text. That place is the whole trick. Paste the embed anywhere else, a paragraph block, a rich-text field, a visual editor, and the page will politely display your code to visitors instead of running it.
| Platform | Where the embed goes |
|---|---|
| WordPress | Custom HTML block (full guide) |
| Shopify | Pages, then Show HTML (full guide) |
| Squarespace | Code Block (full guide) |
| Webflow | Embed element (full guide) |
| Wix | Embed HTML element (full guide) |
| BigCommerce | Page content, HTML view (full guide) |
| Elementor | HTML widget (full guide) |
| Ghost | HTML card (full guide) |
| Framer | Embed component (full guide) |
| Drupal | Full HTML block or field (full guide) |
| Joomla | Custom HTML module (full guide) |
| HubSpot | Embed module (full guide); company records can also feed the locator through HubSpot sync |
| React and Next.js | A script tag in your layout (full guide) |
| Hand-written HTML | Paste in the page body, before the closing body tag |
The pre-launch checklist
Ten minutes here is the difference between launching a page and launching a problem. Work through it on the live URL, not the editor preview, because most editors sandbox scripts and show a broken or blank locator that is fine in production.
- Search for a city you have locations in and one you do not. The empty result should say something helpful, not show a blank map.
- Tap a phone number on a real phone and confirm it dials.
- Tap directions and confirm it opens the maps app at the right building.
- Try every filter, and combinations of them.
- Check the layout at phone width with the keyboard open, which is how most visitors will meet it.
- Add the page to your navigation under a name people type: Find a store, Stockists, Where to buy.
- Open the page in a private window to see it as a stranger, with no logged-in session or cached assets.
Make the page findable, not just functional
A locator widget renders with JavaScript, and search engines index JavaScript-rendered content unevenly. That has one practical consequence: the page the widget sits on should carry its own crawlable substance rather than being an empty shell around an embed.
Give the page a title that says what it is, like Find a store near you, a sentence or two of real text above the widget naming the areas you serve, and a URL worth ranking, such as /store-locator or /find-us. If your locations matter for search individually, a locator that generates an indexable page per location gives each shop its own result in Google rather than hiding all of them behind one widget; that is what location pages are for.
None of this is optional extra credit. The visitors who most need the locator arrive from a search like your brand plus near me, and this is what lets that search find the page.
The one running cost: who pays for the map
Everything above is one-time work. The map is the only part whose cost recurs, because Google Maps and Mapbox charge per map load. Locator tools either bundle those loads into their subscription tiers, which is convenient until a good month pushes you into the next tier, or have you plug in your own provider key so usage lands on your own account at provider rates, inside free allowances most sites never exhaust.
The arithmetic on both providers, with real numbers, is in the map cost guide. Whatever tool you pick, know which model you are buying before traffic grows.
Where Handled Locator fits
Handled Locator is a hosted locator built around exactly this flow: import a CSV or connect a Google Sheet, style the widget with 85+ settings, and paste one embed block into any of the platforms above. The widget renders in a shadow root so your theme and the locator never fight, and it uses your own Google Maps or Mapbox key, so map usage is billed at provider cost rather than marked up.
Plans start at $19 a month for 200 locations and reach 10,000 on the top plan, with a free trial that does not take a card. The live examples show real locators, including the Fornaio site pictured above, and every platform page linked in the table carries current, screenshotted install steps.
Frequently asked questions
Can I add a store locator to my website for free?
Yes, within limits. Free tiers typically cap the number of locations and may meter map usage. For a handful of locations a free tier holds up; check the export path before committing so your data is never stuck. The free store locator guide compares the trade-offs honestly.
Do I need to know how to code?
No. The entire technical step is pasting a provided block of code into the one place your page editor accepts raw HTML, which the table above names for fourteen platforms. If you can paste a YouTube embed, this is the same motion.
Why does my page show the embed code as text?
It was pasted into an element that formats text, so the editor escaped it. Move it into the platform's raw-HTML spot from the table above and republish. This single mistake explains most broken installs.
Why does the locator look broken in my editor preview?
Most site editors sandbox scripts in previews, so an embedded widget renders as a grey box or not at all while being perfectly fine on the published page. Always judge the live URL.
Will the locator slow my website down?
Only the locator page loads the widget, so the rest of the site is untouched. On the locator page itself, ask the vendor for the script's size; a lean widget loads alongside your content without moving your scores meaningfully.
How do visitors' locations get detected?
Two ways, and a good locator offers both: the visitor types a place, which is geocoded, or they allow the browser's location prompt and results sort by distance from where they stand. Nothing is detected without the visitor typing or consenting.
Can the same locator show shops I do not own, like stockists?
Yes. Import stockists or dealers like any location, add filters for what each carries, and use an online sellers tab for web-only options. The stockist guide covers that data model.