
How the pieces divide between Webflow and the locator
The clean split gives each tool the job it is good at. Webflow owns the page: layout, headline, supporting copy, navigation, and the design system around the widget. The locator owns everything about finding: location data, geocoding, proximity search, filters, result cards, the map, and the empty states. The border between them is one Embed element.
This split is why the approach survives redesigns. Rebuild the page, restructure the site, even leave Webflow entirely, and the locator moves with its one embed block, data untouched. It is also why non-designers never need Designer access: hours change and stockists come and go in the locator dashboard, or in a synced Google Sheet, while the Webflow project stays untouched and unpublished.
What about the Webflow CMS?
Webflow's CMS is genuinely good, so the instinct to model locations as a collection is reasonable, and for a simple list page it works. A locator asks more of the data than a collection list can answer: addresses must become coordinates, a visitor's postcode must become a sorted-by-distance result set, and hours must become an open-now answer in the visitor's own timezone. None of that is a CMS bind; all of it is geocoding and search.
So keep the collection and connect it. Webflow CMS sync reads a collection you choose, maps its fields to the locator's, geocodes every address, and re-reads it on a schedule, so the editor who adds a store in Webflow never opens another dashboard. Each item's own id links it to its location, changes are previewed before they apply, and an item that disappears flags its location rather than deleting it. The one setup to avoid is maintaining the same list in both places by hand, because two sources of truth drift apart by exactly one forgotten update; sync makes Webflow the one source.
Add it to the page, step by step
Data first, page second: the embed renders whatever the locator already knows, so an empty locator embeds as an empty page.
- Prepare and import your locations in the locator dashboard first, so the embed has something real to render. One row per location; the data preparation guide covers the columns and the review pass.
- Style the widget to the site: typeface, colours, markers, corners and map style, set in the locator so they arrive with the embed.
- In Webflow, open the page, add an Embed element where the locator should live, and paste the embed code into it.
- The element renders as a placeholder in the Designer. This is Webflow working as designed: custom scripts run on the published site, not in the canvas, so do not debug a blank canvas element.
- Give the section room. The locator manages its own internal layout, but the Webflow section around it should allow enough vertical space that results are usable; a fixed-height wrapper that crops the list is the most common self-inflicted issue.
- Publish to your staging domain and test there: search, filters, phone and directions links, and the phone layout. Then publish to the live domain and re-check once.
Design inheritance, and why your classes do not fight it
A well-built locator widget renders inside a shadow root, the browser's isolation mechanism for components. Your Webflow classes cannot reach in and restyle result cards, and the widget's styles cannot leak out into your page. Both directions of that isolation are protective: a Webflow redesign cannot quietly break the locator's layout, and the locator cannot fight your typography.
Brand matching therefore happens in the locator's settings rather than in Webflow classes, which is the right place for it anyway: set the typeface, palette and marker artwork once and every future embed of the same locator, on any page or any site, carries them. If you want the page and widget sharing an exact typeface, set the same font family on both sides and they will agree without either touching the other.
Fitting it into a Webflow layout
Treat the Embed element like any full-width media block. Give it a section of its own with your standard container width, or let it run full-bleed if the page design leans that way; the widget fills whatever width it is given and manages its own internal columns. The one wrapper mistake that recurs is a fixed height: the widget sizes itself to its content, so a hard-capped wrapper crops the result list on exactly the screens where people scroll it most.
Webflow interactions apply to the wrapper as usual, with one caution. A fade-in or slide-up on scroll is harmless, but patterns that keep the wrapper at display none until a trigger fires can leave the widget measuring a zero-width container at load. If you animate it, animate opacity and transform, not display, which is the same rule Webflow's own docs apply to embedded media.
Sticky navigation sits above the page's flow by design; the widget lives inside the page's stacking context and will not fight it. If a dropdown from your nav ever renders behind the map, raise the nav's z-index in Webflow rather than reaching into the widget.
Before you publish: the short list
All on the published or staging URL, none in the Designer.
- Search a town you serve and one you do not; the empty state should read as intended, in your words.
- Apply each filter, then combinations, and confirm the counts make sense.
- Tap a phone number and a directions link on a real phone.
- Check every Webflow breakpoint you actively design for, plus the smallest one.
- Add the page to site navigation, and point any find-us links at it.
- Load the page in a private window, logged out of everything, as a stranger would.
Where Handled Locator fits
Handled Locator is built for exactly this division of labour: your Webflow site owns the page, Handled owns the locations, search, filters and map, and one Embed element joins them. Locations import from CSV or sync with a Google Sheet, styling covers 85+ settings including custom markers and provider map styles, and the widget runs on your own Google Maps or Mapbox key at provider cost rather than a marked-up meter.
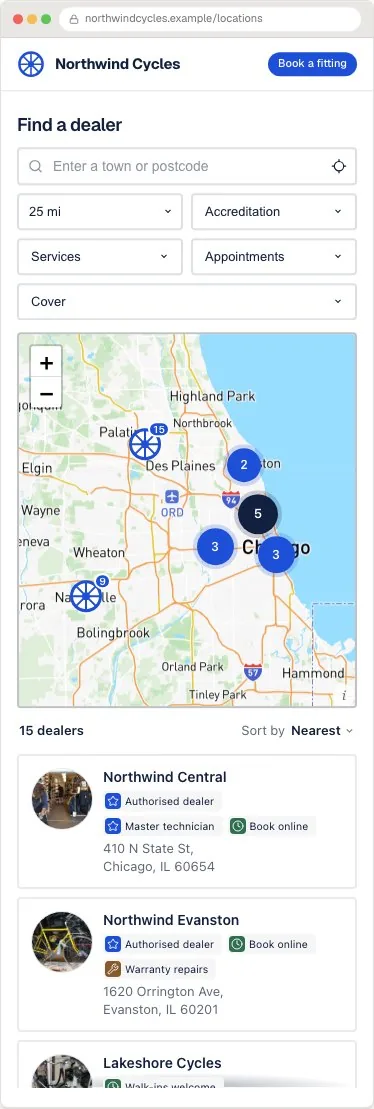
Plans start at $19 a month for 200 locations. The Webflow platform page carries the current install steps, and the live examples include the Northwind dealer setup pictured above before you start a trial.
Frequently asked questions
Why is my store locator blank in the Webflow Designer?
Because Webflow does not run custom scripts in the Designer canvas. The Embed element shows a placeholder while designing and the real widget renders on the published site. Publish to staging and judge it there; a blank canvas element is not a fault.
Does Webflow have a built-in store locator?
No. Webflow provides the page, the CMS and an Embed element for custom code; the locator itself comes from outside, either a hosted widget pasted into an Embed element or a custom build against the CMS and a maps API.
Should I store locations in the Webflow CMS?
You can. Connect the collection with Webflow CMS sync and the locator reads it on a schedule, geocoding every address on the way in, so editors keep working in Webflow. A collection on its own cannot geocode, sort by distance from a visitor, or answer open-now; the locator does all three from the synced records.
Will the locator clash with my Webflow classes?
No. A widget rendered in a shadow root is isolated in both directions: your classes cannot restyle its internals and its styles cannot leak into the page. Brand matching happens in the locator's settings, which also means it survives your next redesign.
Do I need a paid Webflow plan for this?
You need whatever plan lets you publish the site people visit; the Embed element itself is a standard Webflow element. If your site is already published on Webflow, adding a locator changes nothing about your plan.
Can I put the locator on my Webflow site's homepage?
Yes, an Embed element works on any page. The usual pattern is still a dedicated page, Find a store or Stockists, in the navigation, so packaging, ads and search results have one stable URL to point at.
How do I update locations without republishing the Webflow site?
That is the point of the hosted split: locations change in the locator dashboard or a synced Google Sheet and the published page updates without touching Webflow. Republishing is only for changes to the page itself.