
What a store locator does on a Shopify store
A store locator answers one question a product page cannot: where can I get this near me? The visitor types a postcode, a city or a shop name, the locator geocodes what they typed, sorts your locations by distance from that point, and shows the results as cards next to a map. Each card carries the address, opening hours, phone number and a directions link that opens the visitor's own maps app.
Shopify stores need one in three situations. You run physical shops as well as the online store and want foot traffic from the people who prefer to see products first. You sell through retailers or stockists you do not own and need a where-to-buy page so those retail relationships show up on your own site. Or you offer local pickup and want a page that shows pickup points with their hours before checkout does.
Shopify itself ships none of this. The Shopify admin knows about your locations for inventory and pickup, but there is no storefront page a visitor can search. Whatever you choose, the locator is something you add.
Your three options, honestly compared
Every Shopify store locator is one of three things: an app installed from the Shopify App Store, a hosted locator embedded into a page, or something your developer builds against the theme. They differ less in what the visitor sees and more in who controls the data, who pays for the map, and what happens when you change themes.
| App Store app | Hosted locator embed | Custom build | |
|---|---|---|---|
| Setup | Install from the App Store, configure inside Shopify admin | Paste one embed block into a Shopify page | Weeks of developer time |
| Location data lives | Inside the app, sometimes exportable | In the locator dashboard, always exportable | Wherever you built it |
| Map billing | Bundled into the app tier, repriced per load | Your own Google or Mapbox key, billed at provider cost | Your own key |
| Theme change survives it | Usually, but app blocks can need reinstalling | Yes, the embed block moves with the page | Depends entirely on the build |
| Design control | The app's settings, occasionally CSS | Full settings plus CSS, independent of the theme | Total |
| Typical cost | $10 to $50 per month plus map overages | $19 to $79 per month, maps at provider cost | Thousands up front, then maintenance |
Where the surprise bills come from
The map is the only part of a locator whose cost scales with your traffic, because Google Maps and Mapbox bill per map load. This single fact explains most locator pricing, and it splits the market in two.
Apps that bundle the map into their monthly tiers have to price for their heaviest users, so light users subsidise heavy ones, and crossing a tier boundary in a good month is how a $15 app becomes a $49 app. Tools that ask for your own map provider key pass the cost straight through: you create a key with Google or Mapbox once, and map usage lands on your own bill at provider rates, which include a free monthly allowance generous enough that most small and mid-size stores pay nothing at all for maps.
Bringing your own key is fifteen minutes of setup you would not otherwise do, and it is the reason we wrote a separate guide to what Google Maps and Mapbox actually charge. Read it before you compare tools on their sticker price, because the sticker is not where the money is.
How to add a store locator to Shopify, step by step
The sequence below is for a hosted locator. With an App Store app the middle steps happen inside Shopify admin instead, but the data preparation and the testing at the end are identical, and they are the steps that decide the quality of the page.
- Prepare your location data as a spreadsheet, one row per location. The next section covers the columns that matter and the one mistake that hurts later.
- Create the locator and import the file. Watch the import report: rows that failed to geocode or landed as duplicates are cheapest to fix now, while you still remember what the data means.
- Configure search and filters. Decide the search radius, the distance unit, and which fields visitors can filter by. A dozen shops need no filters; a hundred stockists carrying different product lines need one.
- Match your brand. Set the fonts, colours, marker shape and map style so the page reads as part of your store. This is the difference between a locator that looks native and one that looks bolted on.
- In Shopify admin, go to Online Store, then Pages, and create or open your locations page. Switch the editor to Show HTML and paste the embed code. The editor's normal mode escapes pasted markup, which is the most common reason an embed appears as visible code instead of a map.
- Save, then open the page from your storefront rather than the editor preview. Theme editor previews sandbox scripts, so the locator can look broken in a preview while being fine on the live page.
- Add the page to your navigation, usually under a name visitors actually type, like Find a store or Stockists.
- Test on a phone before you announce it: search, filters, a phone number tap, a directions tap, and the layout with the keyboard open. Most of your traffic will meet the page exactly this way.
Prepare the data before the tool
Every locator is a view over a list of places, so the list is the product. One row per location, with a stable name, street address, city, region, postcode, country, phone, and opening hours. Add a column for anything visitors will filter by, such as the product lines a stockist carries or whether a location offers pickup.
The mistake that hurts later is not a missing column, it is unstable names. The second time you import, the locator matches rows to existing locations, and if the same shop is called something slightly different in the new file you get a duplicate pin rather than an update. Pick one canonical name per location and keep it identical across every export you will ever send.
If your team edits locations often, connect a Google Sheet instead of re-uploading files. Hours change, stockists come and go, and a synced sheet means the person who knows about the change makes it in a tool they already use, without touching Shopify or the locator dashboard. The Google Sheets workflow has its own guide.
Stockists and where-to-buy pages
Brands on Shopify often need the locator for shops they do not own. If supermarkets, pharmacies or independent retailers stock your product, a where-to-buy page does two jobs at once: it sends buyers to your retail partners, and it shows those partners you are driving them traffic, which is a genuinely useful thing to bring to a wholesale conversation.
The page needs two things a shop-finder does not. Filters that match how people choose a retailer, such as which of your product lines each one carries. And a way to show online sellers alongside physical ones, because your product being on a marketplace matters to someone with no stockist within fifty miles. A locator that supports an online options tab handles this without a second page.
The stockist locator guide covers the data model for this in more depth, including how to handle a retailer with two hundred branches.
Mistakes that surface after launch
These are the ones we see in real setups, roughly in order of how often.
- Publishing without testing on a phone. Desktop-perfect locators overflow, clip buttons or bury the list under the map at 390 pixels wide, and nobody notices because everyone who built the page did so on a laptop.
- Pasting the embed in the normal editor mode instead of Show HTML, so the page shows the code itself. Thirty seconds to fix, embarrassing for however long it stays live.
- Renaming locations between imports and shipping a page of duplicate pins.
- Choosing a tool without asking who pays for the map, then meeting the answer in month three.
- Leaving the page out of navigation. A locator nobody can find performs identically to no locator.
- Skipping opening hours. Hours are the most-checked field on a result card, and a card without them sends the visitor back to Google, which is exactly where you did not want them to go.
Where Handled Locator fits
Handled Locator is the hosted-embed option in the comparison above. You manage locations in its dashboard, through CSV imports or a synced Google Sheet, and place the widget on a Shopify page with one embed block. It exposes 85+ settings covering search, filters, layout, markers, map styles and typography, so the page can match your theme without code, and it uses your own Google Maps or Mapbox key, so map usage is billed at provider cost rather than marked up.
Plans start at $19 a month for up to 200 locations, and the top plan serves 10,000. Installation is either the Shopify App Store app, which adds a Store locator block to the theme editor and takes the site ID, or the paste-into-a-page route above. The honest limit: if you want a tool where the map bill is somebody else's problem, this is not that tool, by design. Pro and Business accounts get scoped REST and Query APIs for reading and writing locations from your own systems.
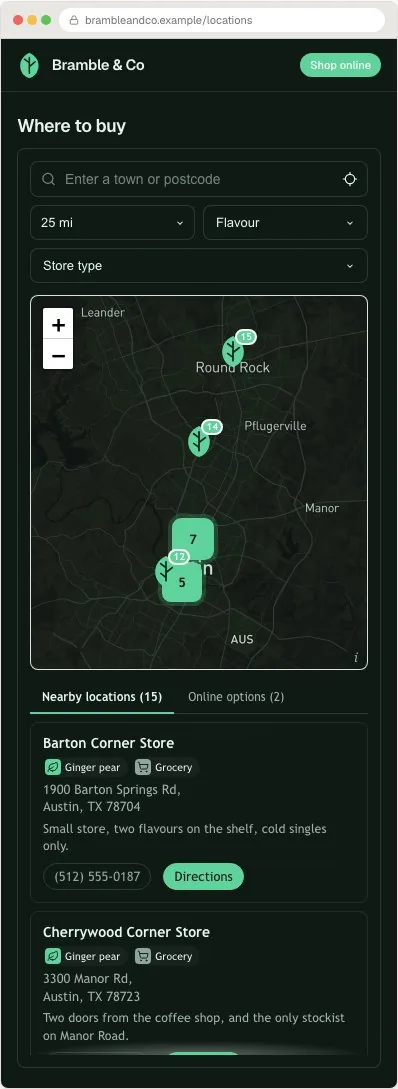
The Shopify installation guide has the current steps with screenshots, and the live examples show real locators, including the Bramble setup pictured above, before you start a trial.
Frequently asked questions
Does Shopify have a built-in store locator?
No. Shopify tracks locations in the admin for inventory and pickup, but it ships no storefront page a visitor can search. Every Shopify store locator is added, either as an App Store app, an embedded hosted locator, or a custom build.
Do I need an app from the Shopify App Store?
No, though Handled Locator is listed there and the app is the same locator with a theme block. An app is one distribution channel, not a requirement. A hosted locator embedded in a Shopify page does the same job, keeps your location data exportable, and survives theme changes. The App Store route trades some of that control for a faster install.
Will a store locator slow my Shopify store down?
Not if it only loads on the locations page. The thing to check is the bundle: a locator that ships its whole map library on every page of your store is paying a speed cost storewide for a page most visitors never open. Ask for the script size and where it loads before installing anything.
How much does a Shopify store locator cost?
App Store apps run roughly $10 to $50 a month with map usage priced into the tiers. Hosted locators run about $19 to $79 a month with maps billed separately at provider cost, which is often zero inside Google's and Mapbox's free allowances. Custom builds cost thousands up front. The map billing model matters more than the sticker price once traffic grows.
Can I show stockists and retailers instead of my own shops?
Yes, and this is one of the most common Shopify uses. Import stockists like any other location, add filters for the product lines each one carries, and use an online options tab for marketplace and web-only sellers so a visitor with no nearby stockist still has somewhere to buy.
Can I manage locations from a Google Sheet?
With Handled Locator, yes. Connect a sheet once and edits sync without re-uploading files, which suits teams where the person who knows about a change is not the person with Shopify access. CSV import remains available for one-off loads.
Why does my embed show code instead of a map?
The page editor was in its normal mode when the code was pasted, so Shopify escaped the markup. Open the page, switch the editor to Show HTML, paste the embed again, and save. Then check the live page rather than the theme preview, which sandboxes scripts.